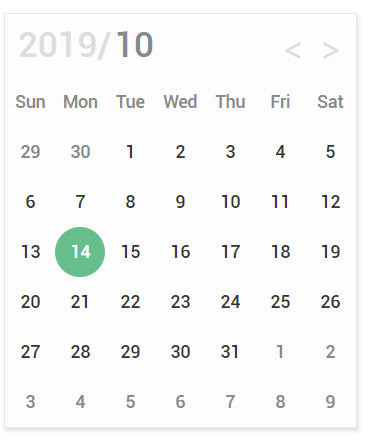
需求, 能够选中日期然后返回字段。另外, 设计页面时遵循:
- 基础事件所需要的界面
- 自己作为用户确认是否继续添加交互
- 根据 2 回到 1 或结束
date picker 来源
来源是这个网站
界面构建阶段
首先先写好界面, 然后保证结构不变添加事件, 再依次完善事件界面
完成界面, 完完整整根据设计图来就行
为了省事大部分css与原网址一致, 注意此阶段写死了参数, 后面js动态生成时会更改
用最常见的样式, 这是在网上找到的, 其动态效果的触发为 :placeholder-shown, hover, focus ,属性为 transform 中的 translate, scale, transform-origin。控制为 transition
触发含义: placeholder(占位符)是否展示。
属性含义: 移动, 缩放, 动画效果起始点。

原网址用的 stylus css预处理器, 可以通过css框的右上角的箭头 选择 view compiled css 看处理后的 css
1
2
3
4
5
6
7
8
9
10
11
12
13
14
15
16
17
18
19
20
21
22
23
24
25
26
27
28
29
30
31
32
33
34
35
36
37
38
39
40
41
42
43
44
45
46
47
48
49
50
51
52
53
54
55
56
57
58
59
60
61
62
63
64
65
66
67
68
69
70
| <style>
#inp {
cursor: pointer;
width: 100%;
border: 0;
padding: 12px 0;
height: 48px;
font-size: 18px;
font-weight: 500;
border-bottom: 2px solid #c8ccd4;
border-radius: 0;
color: #223254;
transition: all 0.15s ease;
}
#inp:hover {
background: rgba(34, 50, 84, 0.03);
}
#inp:not(:placeholder-shown) + span {
color: #5a667f;
transform: translateY(-26px) scale(0.75);
}
#inp:focus {
background: none;
outline: none;
}
#inp:focus + span {
color: #07f;
transform: translateY(-26px) scale(0.75);
}
#inp:focus + span + .border {
transform: scaleX(1);
}
.inp {
position: relative;
top: 50px;
margin: auto;
width: 100%;
max-width: 280px;
display: block;
}
.inp * {
box-sizing: border-box;
}
.label {
position: absolute;
top: 16px;
left: 0;
font-size: 16px;
color: #9098a9;
font-weight: 500;
transform-origin: 0 0;
transition: all 0.2s ease;
}
.border {
position: absolute;
bottom: 0;
left: 0;
height: 2px;
width: 100%;
background: #0077ff;
transform: scaleX(0);
transform-origin: 0 0;
transition: all 0.15s ease;
}
</style>
<label for="inp" class="inp">
<input type="text" id="inp" placeholder=" " />
<span class="label">Label</span>
<span class="border"></span>
</label>
|
头部
布局用的float, 周围的空白用的 padding, text-indent控制。

1
2
3
4
5
6
7
8
9
10
11
12
13
14
15
16
17
18
19
20
21
22
23
24
25
26
27
28
29
30
31
32
33
34
35
36
37
38
39
40
41
42
43
44
45
46
47
48
49
50
51
52
53
54
55
56
57
58
59
60
61
62
| <style data="wrap背景阴影">
.wrap {
position: absolute;
background: #fdfdfd;
border: 1px solid #e8e8e8;
box-shadow: 1px 2px 3px #ddd;
}
</style>
<style data="hd年月份">
.hd {
padding: 10px 0;
height: 30px;
line-height: 30px;
}
.date-year {
font-size: 28px;
text-indent: 10px;
text-decoration: none;
float: left;
}
.year {
color: #ddd;
}
.m {
color: #888;
margin-left: -5px;
}
.arrow {
width: 50px;
margin-right: 10px;
float: right;
font: 500 26px sans-serif;
color: #ddd;
}
.prev {
cursor: pointer;
float: left;
}
.next {
cursor: pointer;
float: right;
}
</style>
<div class="wrap" style="width: 280px;">
<div class="content">
<div class="date">
<div class="hd">
<a href="javascript:;" class="date-year">
<span class="year">2019/</span>
<span class="m">10</span>
</a>
<div class="arrow">
<span class="prev"><</span>
<span class="next">></span>
</div>
</div>
<div class="ct"></div>
</div>
<div class="month"></div>
</div>
<div class="info"></div>
</div>
|
主体
注意拥有float属性的元素的父元素需要加个宽度

1
2
3
4
5
6
7
8
9
10
11
12
13
14
15
16
17
18
19
20
21
22
23
24
25
26
27
28
29
30
31
32
33
34
35
36
37
38
39
40
41
42
43
44
45
46
47
48
49
50
51
52
53
54
55
56
57
58
59
60
61
62
63
64
65
66
67
68
69
70
71
72
73
74
75
76
77
78
79
80
81
82
83
84
85
86
87
88
89
90
91
92
93
94
95
96
97
98
99
100
101
102
103
104
105
106
107
108
109
110
111
112
113
114
115
| <style data="ct主体">
.week {
color: #888;
}
ul,
ol,
li {
list-style: none;
padding: 0;
margin: 0;
}
html {
font: 500 14px 'roboto';
color: #333;
}
.wrap li {
position: relative;
float: left;
text-align: center;
border-radius: 50%;
width: 40px;
height: 40px;
line-height: 40px;
}
.items > li {
width: 280px;
}
.old {
color: #888;
}
.now {
color: #fff;
background: #66be8c !important;
}
.new {
color: #888;
}
</style>
<div class="wrap" style="">
<div class="content">
<div class="date">
<div class="hd">
<a href="javascript:;" class="date-year">
<span class="year">2019/</span>
<span class="m">10</span>
</a>
<div class="arrow">
<span class="prev"><</span>
<span class="next">></span>
</div>
</div>
<div class="ct">
<ol class="week">
<li>Sun</li>
<li>Mon</li>
<li>Tue</li>
<li>Wed</li>
<li>Thu</li>
<li>Fri</li>
<li>Sat</li>
</ol>
<ul class="items">
<li>
<ol class="days">
<li class="old">29</li>
<li class="old">30</li>
<li>1</li>
<li>2</li>
<li>3</li>
<li>4</li>
<li>5</li>
<li>6</li>
<li>7</li>
<li>8</li>
<li>9</li>
<li>10</li>
<li>11</li>
<li>12</li>
<li>13</li>
<li class=" now">14</li>
<li>15</li>
<li>16</li>
<li>17</li>
<li>18</li>
<li>19</li>
<li>20</li>
<li>21</li>
<li>22</li>
<li>23</li>
<li>24</li>
<li>25</li>
<li>26</li>
<li>27</li>
<li>28</li>
<li>29</li>
<li>30</li>
<li>31</li>
<li class="new">1</li>
<li class="new">2</li>
<li class="new">3</li>
<li class="new">4</li>
<li class="new">5</li>
<li class="new">6</li>
<li class="new">7</li>
<li class="new">8</li>
<li class="new">9</li>
</ol>
</li>
</ul>
</div>
</div>
<div class="month"></div>
</div>
<div class="info"></div>
</div>
|
交互事件阶段
####
插件改写阶段
css 命名空间
没有采用前缀限制, 好奇css module里的类名, 所以玩玩, 探索一下。一激灵, 写成了用webpack打包的样子, 虽然还是能将生成的main.js引入html来达到想要的效果, 但是这已经和jquery 没关系了, 所以还是回到正道上吧


